Simple Digital Tachometer Circuit Diagram Again, these tachometers can't measure extra details like deviation and average. So, the analog tachometer uses an external frequency-to-voltage converter to measure the RPM. It also displays the converted voltage via an analog voltmeter. Plus, these tachometers don't have the technology for the storage of readings. Digital Tachometer Tachometer: The tachometer is used to measure an RPM counter which counts the number of rotations per minute. Here in this project, we are going to design an IR sensor module to recognize objects for count rotation of any rotating body. IR Sensor Module: An IR sensor is an electronic instrument that is utilized to genuine certain features

Tachometer is a RPM counter which counts the no. of rotations per minute.There are two types of tachometer - one is mechanical and the other one is digital. Here we are going to design an Arduino based digital tachometer using IR sensor module to detect object for count rotation of any rotating body. As IR transmits IR rays which reflect back to IR receiver and then IR Module generates an

How to Build a Digital Tachometer Circuit: Complete Circuit Diagram Guide
DIY Non-Contact Tachometer (RPM Meter) With Arduino and IR Sensor: A RPM meter is a simple device that is especially useful for example in a machining workshop to meassure the RPM of a machine's spindle and thus determine the surface speed of a tool or workpiece. If you use my board design, you do not have to change anything in this section

A tachometer is a device estimating the rotation speed of a disk or plate, as in an engine or other machine. The engine drives the wheel and generates pulses. These pulses are then read by a tachometer. This device generally shows the revolutions per minute (RPM) on an adjusted Analog dial, yet the digital tachometer shows are progressively normal.

How to Build a Tachometer/Speedometer with an Optoelectronic Sensor, a ... Circuit Diagram
DIY Tachometer (RPM Meter): In this project I will show you how a 3€ IR distance sensor works and how we can use it to build a proper DIY tachometer that functions properly. Here you can find the schematic with reference pictures of my finished board design. Use them to create your own! Step 4: Upload the Code! Here you can find the code
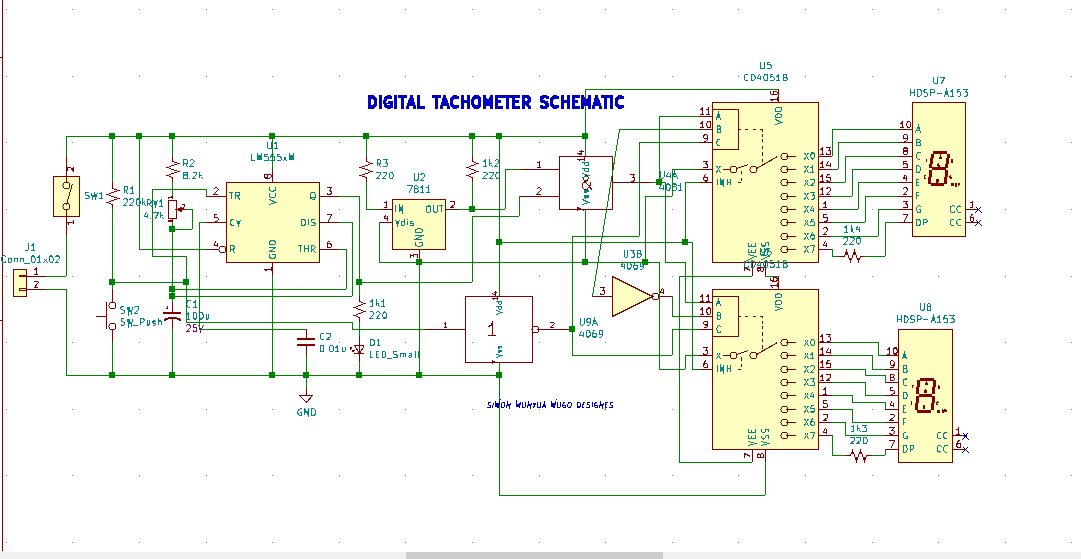
Building a digital tachometer circuit is a straightforward process that requires a few components and basic knowledge of electronics. Follow this step-by-step guide to successfully create your own digital tachometer. 1. Gather the necessary components. Before you start building the circuit, make sure you have all the required components. This project uses a C8051 microcontroller development kit, an optoelectronic sensor, a variable-speed DC motor, a 5-inch diameter transparent disc, and the Simplicity Studio IDE to quickly and easily build a tachometer and speedometer. The measured data is sent to a terminal window via the UART. This is part one of a two-part project.